Walkthrough
This page will walk you though setting up a basic Android app which contains a WRLD map. For a complete project, see our Github example repo.
Prerequisites
To work through the example, you will need:
- Android Studio. This walkthrough has been tested with version 4.1.2. You will also need the Android SDK and supporting libraries appropriate for your target platform.
- A WRLD API key. Sign up here for a Digital Twin account and create an API key for your walkthrough example app. The token is a string consisting of 32 alphanumeric characters.
Creating your Android application
Start Android Studio, and create a new project. You will be guided through project configuration steps – default values should be fine.
- Specify a project name and location.
- Ensure the target device is “Phone and Tablet”, and set “Minimum SDK” to 15 or later. (These should be selected by default.)
- Select “Empty Activity”
- Ensure “Generate Layout File” is selected.
Android Studio will then create a skeleton app – this may take a minute or two. If your Android Studio setup is missing dependencies, you will be prompted to install these.
If you open the Project view, you should see something like:

Add permissions
In order to access WRLD’s cloud-based map data, the SDK requires access to the Android device’s network connection. Typically, apps will also make use of Android location services. To request these services, open the AndroidManifest.xml file under the manifests folder in the Project view:

Add the following uses-permission elements as children of the manifest node:
    <manifest xmlns:android="http://schemas.android.com/apk/res/android" package="com.example.myapplication">
        <uses-permission android:name="android.permission.ACCESS_NETWORK_STATE" />
        <uses-permission android:name="android.permission.INTERNET" />
        <uses-permission android:name="android.permission.ACCESS_COARSE_LOCATION" />
        <uses-permission android:name="android.permission.ACCESS_FINE_LOCATION" />
        <uses-permission android:name="android.permission.ACCESS_WIFI_STATE" />
    ...
    </manifest>
(See a full example manifest on Github.)
Add SDK dependency
The SDK is available through our Maven repository.
Android Studio uses gradle to resolve library dependencies. To use the WRLD Android SDK, you will need to add our repository and the WRLD SDK as a dependency in the app module’s build.gradle file.
Open the app module’s build.gradle file. In the dependencies section, you should see some standard Android compilation dependencies (versions may not match those shown below if updates have been released). Add the WRLD SDK library specification to this section:
    dependencies {
        implementation fileTree(dir: 'libs', include: ['*.jar'])
        implementation 'com.wrld3d:wrld-android-sdk:0.0.1467@aar'
        ...
        implementation 'androidx.appcompat:appcompat:1.2.0'
You may also need to add mavenCentral() in your project’s root build.gradle file if not already present as shown below:
buildscript {
    repositories {
        ...
        mavenCentral()
allprojects {
    repositories {
        ...
        mavenCentral()
On the next gradle sync, gradle will download the library to your gradle cache.
(See a full example build.gradle on Github.)
Add map to layout
To add the map to the UI layout, open the activity’s layout xml file, under res/layout in the project view.
First add the eegeo XML namespace to the top level layout element:
xmlns:eegeo="http://schemas.android.com/apk/res-auto"
The default activity layout may include a placeholder TextView element. Replace this with a MapView element. You can specify the starting location and zoom level in the layout as well – these values will take you to San Francisco:
    <com.eegeo.mapapi.MapView
        android:id="@+id/mapView"
        android:layout_width="fill_parent"
        android:layout_height="fill_parent"
        eegeo:camera_target_latitude="37.7858"
        eegeo:camera_target_longitude="-122.398"
        eegeo:camera_zoom="16"
    />
(See a full example layout on Github.)
Configure activity
Set up the map within the main activity by editing MainActivity.java. You will need to add the following code in onCreate:
- Initialize the
EegeoApiobject with your API key by adding ` EegeoApi.init(this, “Insert 32 character API key here”); ` - Find the MapView in the layout and store the object in a field
- Call MapView.onCreate method
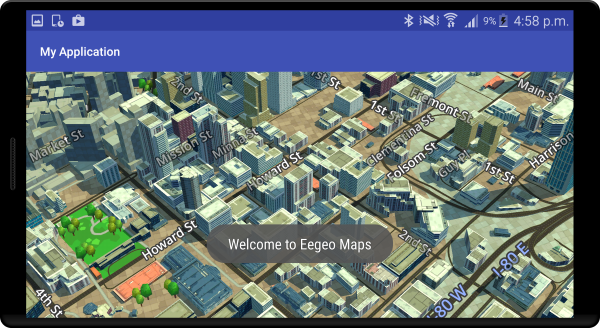
- (Optional) Set a callback to get the EegeoMap object – the example below adds a Toast notification when the map is available.
Finally, pass on notification of the Activity onPause onResume and onDestroy lifecycle events by calling the MapView equivalents. Your final Activity class will look like this:
    import android.os.Bundle;
    import android.support.v7.app.AppCompatActivity;
    import android.widget.RelativeLayout;
    import android.widget.Toast;

    import com.eegeo.mapapi.EegeoApi;
    import com.eegeo.mapapi.EegeoMap;
    import com.eegeo.mapapi.MapView;
    import com.eegeo.mapapi.map.OnMapReadyCallback;

    public class MainActivity extends AppCompatActivity {

        private MapView m_mapView;

        @Override
        protected void onCreate(Bundle savedInstanceState) {
            super.onCreate(savedInstanceState);

            // You may wish to specify your API key as a string resource instead
            EegeoApi.init(this, "Insert 32 character API key here");

            setContentView(R.layout.activity_main);

            m_mapView = (MapView)findViewById(R.id.mapView);
            m_mapView.onCreate(savedInstanceState);

            m_mapView.getMapAsync(new OnMapReadyCallback() {
                @Override
                public void onMapReady(final EegeoMap map) {
                    Toast.makeText(MainActivity.this, "Welcome to Eegeo Maps", Toast.LENGTH_LONG).show();
                }
            });
        }

        @Override
        protected void onResume()
        {
            super.onResume();
            m_mapView.onResume();
        }

        @Override
        protected void onPause()
        {
            super.onPause();
            m_mapView.onPause();
        }

        @Override
        protected void onDestroy()
        {
            super.onDestroy();
            m_mapView.onDestroy();
        }

    }
(See a full example Activity on Github.)
You should now be able to build and run your app, either on a connected device or in an emulator if you have one configured. When you start your app, you should see something like:

More examples
See more features in our SDK examples, including camera control, markers, and indoor maps.
Support
If you have any feedback, questions, bug reports, or feature requests, we’d love to hear from you! Just create an issue in the issue tracker on GitHub.